Brodies Buzzy Bees
January 22, 2023
Cascade Leggett
,
,
BRODIE’S BUZZY BEES
A recipe named for the staff at the Seabreeze café. Westmere. Auckland. Aotearoa NZ
- Makes about 6 – 15 Buzzy Bees depending on how big or small you decide to make them. [It’s easier working with larger Buzzy Bees so you might want to make bigger ones the first time].
- You start with marzipan. Marzipan is not almond paste although made with the same ingredients.
- Marzipan is stiffer to work with which makes rolling to shape and size easy and creates smooth perfect Buzzy Bee shapes.
- This recipe is also suitable for vegans and pregnant people as its an eggless version of marzipan.
INGREDIENTS
FOR THE MARZIPAN
- 1 Cup Ground Almonds [Also known as Almond Flour. Or ground blanched almonds without the skins]
- ¾ Cup Icing Sugar [Also known as Powdered Sugar or Confectioners’ Sugar]
- 1-2 Tablespoons Liquid Glucose [Also known as Corn Syrup]
- 2 drops of pure Almond Essence [Or pure vanilla essence if you prefer]
- Red, blue, yellow food colourings
ASSEMBLY ITEMS
- Rice vermicelli for the antennae
- A toothpick to position the antennae
- Spaghetti for the wing struts
- Melted compound chocolate to keep the heads attached
- Black and yellow food colourings for painting on the details
- A small artist painting brush with pointed end
- An image of the iconic Aotearoa Buzzy Bee. [Supplied below]
MARZIPAN METHOD
- Put the ground almonds and the icing sugar into a bowl and mix until well combined.
- Add 1 TABLESPOON of the liquid glucose and using a knife mix until a dough forms.
- Add ONE TEASPOON more of liquid glucose if the dough is not sticking together. Then mix well again. Repeat this step if necessary but be careful not to add too much more glucose. You are aiming to achieve a dough you can knead without it being too sticky to knead and roll.
- Take it out of the bowl and knead it by hand until its smooth and firm.
- Take half the dough and add red food colouring. That’s going to make the main body of the buzzy bees and the antenna tops. Knead in enough food colouring until you have a bright red dough
- Cut off 2/3 of the remaining piece. Add yellow food colouring. This will be the head and wings. Knead in enough food colouring until you have a bright yellow dough.
- Add blue food colouring to the remaining 1/3. This will be the wheels. Knead in enough food colouring until you have blue dough.
NOW HERE’S THE FUN PART. INSTRUCTIONS TO ASSEMBLE YOUR BUZZY BEES
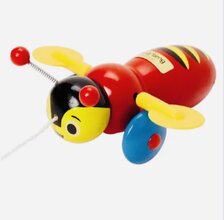
Use this image of the iconic Buzzy Bee as your template
 1. Roll the red dough into a long tube.
2. Cut off pieces and form into the elongated circular shape of the buzzy bee body. Make sure you leave some red dough for the tops of the antennae.
 3. Cut off pieces of the yellow dough and roll into circles for the buzzy bee heads. Make sure you leave some for the wings.
4. Make small flat circular discs for the wings with the rest of the yellow dough. Cut spaghetti pieces to size. Position and push through the front end of the body. Form and attach 2 wings of the yellow dough to each end.
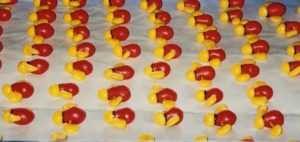
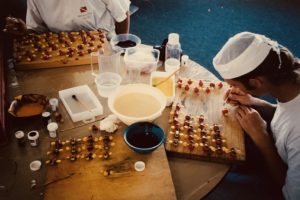
5. Melt some compound chocolate. Let it cool down a bit and attach the heads to the bodies. This can be a bit tricky. You want just enough chocolate to hold the head and body in place. Gently prop each of them up with a food safe object until completely set. [We folded pieces of paper towels into small mounds under each head to prop them up and support them until the chocolate set hard.]
 6. Cut off pieces of the blue dough and shape into buzzy bee flat circles for the wheels. Attach the 2 blue wheels just below the wings with a little bit of melted compound chocolate. Hold in place until they stick together.
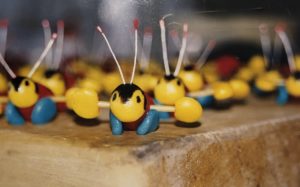
7. Cut vermicelli to size to create antennae. Gently add a tiny ball of red dough to the top of each antenna. Push a toothpick into the 2 positions for the antenna holes and release the toothpick. Gently position the vermicelli strands into the head of the buzzy bee and re-shape the head.
AND NOW: THE FINAL TOUCHES!
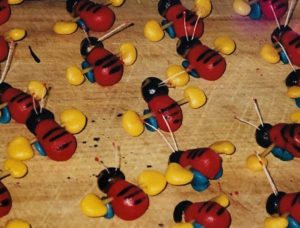
 8. Paint on the iconic Buzzy Bee body stripes using black and yellow food colouring.
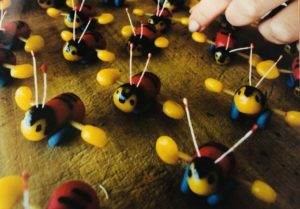 9. Paint on the black head cap and 2 dots for eyes with black food colouring.
- Your edible Buzzy Bees are now ready to be eaten or used as decorations for a celebration dessert or cake.
- Keep your Buzzy Bees in a cool dry dark place or the fridge if not using immediately. They should keep well for up to 2 weeks.
- For total authenticity you may wish to add a strip of licorice [also known as liquorice] for the pull-along string that is attached to the head on the real Buzzy Bee. This works best if your Buzzy Bees are not too small. You have to press the licorice into the head then re-form and smooth the head around the licorice end before painting.